Don't want to code? Get instant access to the Recharge/Shopify Ajax Generator tool!
ReCharge and Shopify are like two peas in a pod.
Er…let me say two peas in different pods.
The systems work very well, but a lot of the customization has to be left to developers. And…they don’t share the same checkout.
ReCharge is a checkout used for subscription products and Shopify has a checkout for Shopify products. One is for subscription, one is for non-subscription. So, it’s very important that the users go through the correct checkout. If they go through the wrong checkout, it can be very annoying for the business, customer and ReCharge’s support team.
One of the flaws and issues that I’ve noticed with ReCharge is that the default setting for a user is to take the standard eCommerce path: Product page–>Add to Cart–>Checkout. This is the default solution that ReCharge provides you. There really isn’t a way to bundle ReCharge and Shopify products into the same cart simultaneously.
Until now…
This tutorial goes over how to add any kind of products to a cart if you’re using ReCharge. You can do multiple subscription, single products, single products and a subscription product or any combination. Ideally, if you just want to add regular Shopify products to the cart with Ajax, you can do it with this code too, but you’ll need a ReCharge Checkout.
Anyway, product page is chunky and doesn’t allow for much customization. Plus, if a user goes through this standard checkout, they may even bypass the ReCharge checkout and checkout through Shopify with a subscription product. Then, you need to email ReCharge to add the user to the correct subscription plan. What a mess.
And, to make matters more murky, I received an email from their support and their own team admits:
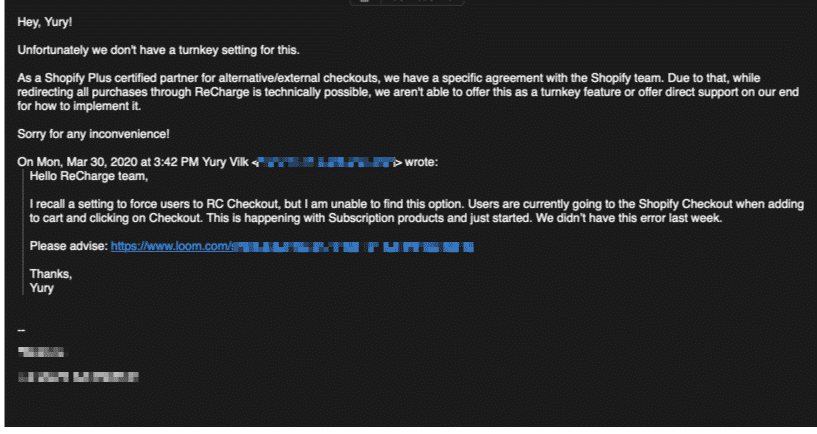
What one of the Tier 2 support agents mentioned to me in an email:
Unfortunately we don’t have a turnkey setting for this.
As a Shopify Plus certified partner for alternative/external checkouts, we have a specific agreement with the Shopify team. Due to that, while redirecting all purchases through ReCharge is technically possible, we aren’t able to offer this as a turnkey feature or offer direct support on our end for how to implement it.
Sorry for any inconvenience!
Total bummer.
The default setting for ReCharge is this route and they don’t have a turnkey solution for solving a very obvious problem.
What’s more, ReCharge offers some documentation about Shopify AJAX and ReCharge parameters that can be used, but it’s fairly opaque. Now, I’m not a developer, but I do know how to code. For me, the documentation is hard to follow.
To be clear, I’m not complaining, I’m just sharing the issues we’ve run into with using ReCharge on our subscription box platform.
With ReCharge’s stock implementation, you’re sort of forced to deal with the product pages as your main vehicle for new customer acquisition and sales.
But, what if you have variants? What if we want to offer prepaid, multi-month subscription plans? Like 3 month, 6 month or annual subscriptions to a box, instead of just monthly? What if you want to have everything on a single landing page designed to convert?
You can start understanding where this stock implementation becomes problematic. The usual route would be that we need to take the user through the clunky, unreliable checkout solution that ReCharge offers.
Together with a custom landing page builder, like Shogun or Gem Pages, you can really create some neat designs that don’t distract the user with the stock visual elements.
Generally, most subscription stores that I’ve worked with leverage a singular, well made home page that directs the user into the ReCharge checkout post-click. This allows for a seamless experience.
You can control the look and feel of your website whilst controlling the outcome of the user’s click.
The solution that my team and I have worked on is to bypass the Add to Cart altogether and go straight to checkout via AJAX. We since had an old solution and a new solution.
Our old solution worked great, until…we had a major issue. The issue was that we wanted to offer a welcome bonus for the higher tiered, multi-month plans for users. In other words, when the user selects the 6-month package, he or she would also receive a free bonus valued at $XX.XX. From an inventory standpoint this helps because it helps liquidate older inventory. And from a conversion standpoint this is, of course, to incentivize the user to spend more with us up front so we can take advantage of the capital sooner.
The old solution would add the products to the cart upon a click of a button, but the bonus was set to rebill every month, instead of a single-purchase. So the old solution was pretty binary and didn’t really didn’t account for what products rebilled when. It just added everything you set in the cart. ReCharge would interpret all the products as the same rebill frequency. Therefore, you would get a mess for fulfillment when they are gathering the products together.
Every month, the bonuses would show up and you would have to manually remove them from the spreadsheet.
So I consulted one of my good friends Brian Thomas, who owns an eCommerce consulting agency, to help me out with the code. If you haven’t checked out his upsell solution for ReCharge, I encourage you to check it out. It offers a one-click upsell for ReCharge subscriptions. And yes, you should definitely be doing this, otherwise you are leaving money on the table.
Anyway, he and I worked out a code that would function the way it’s intended and allow for multiple products to be stored in an array inside of the button, vs. having to manually code each bundle.
I also built a Recharge / Shopify Ajax Add to Cart Code Generator Tool Generator Tool that you can use to help you generate the code, so you don’t have to think too much. You’ll have to enter your email and I’ll send it to you. In this tool, you’ll have to enter your own parameters and variants, but once you fill in the blanks, the button code is generated for you.
Below are the instructions that ReCharge doesn’t offer with their AJAX advice.
Add this code to a a .JS file in your theme or in a side-loaded JS file that you add to your theme. Most themes have something called utilities.js. This is loaded on every page. That’s a great place for it.
Before You Begin With the Ajax Add to Cart Code with Shopify & Recharge
You will need to create your products and figure out the variant IDs. In general, every product will have a variant ID even if it’s a singular product (1 variant). At least it did at the time of writing, things could have changed.
- Create your products
- Create your variants
- Create your Rulesets in Recharge
The Ajax Add to Cart with Recharge & Shopify Code
$(document).ready(function() {
$(‘.js-bundle’).click(addBundleToCart);
console.log($(‘.js-bundle’));
});function addBundleToCart(e) {
var data = new Array();
var ids = $(this).data(‘ids’);
console.log(ids);
var frequency = $(this).data(‘frequency’);
var unit = $(this).data(‘unit’);
for (var i=0; i < ids.length; i++){
if (frequency[i] == 0) {
data.push({
“quantity”: 1,
“id”: ids[i],
});
} else {
data.push({
“quantity”: 1,
“id”: ids[i],
“properties[shipping_interval_frequency]”: frequency[i],
“properties[shipping_interval_unit_type]”: unit,
});
}
}jQuery.ajax({
type: ‘POST’,
url: ‘//eadn-wc03-7781062.nxedge.io/cart/add.js’,
data: { items: data },
dataType: ‘json’,
success: function() {
window.location.href = getCartUrl();
}
});
}function getCartUrl() {
function get_cookie(name){ return( document.cookie.match(‘(^|; )’+name+’=([^;]*)’)||0 )[2] }
do {
token=get_cookie(‘cart’);
}
while(token == undefined);var myshopify_domain=’your-domain.myshopify.com’
try { var ga_linker = ga.getAll()[0].get(‘linkerParam’) } catch(err) { var ga_linker =” }
var customer_param = ‘{% if customer %}customer_id={{customer.id}}&customer_email={{customer.email}}{% endif %}’
return “https://checkout.rechargeapps.com/r/checkout?myshopify_domain=” + myshopify_domain + “&cart_token=”+token+”&”+ga_linker+”&”+customer_param;
}
NOTE: Change var myshopify_domain=’your-domain.myshopify.com’ to your store’s domain.
The HTML Button Code
Then you will need to add this code when you want a button to appear:
<button data-ids=”[12345678910, 12345678910, 12345678910]” data-frequency=”[1, 0, 0]” data-unit=”month” class=”js-bundle”>SOME TEXT</button>
Replace the first value in the array (after the “[“) with the variant id. Same with the second and third within that same array. Do this for as many products as you want added to checkout simultaneously.
Don’t forget to include the class “js-bundle” or it will not function!
Where to find the variant ID for Recharge
Navigate to a product page and append .xml to the URL string. This will pull up a product XML file. It will look like this:
https://yourstore.myshopify.com/admin/products/[productID].xml
This will pull up the XML file and you can then look at the variant ID. An example variant ID is shown in the screenshot below.
<variant>
<id type=”integer”>[variant ID]</id>

There is no limit here. In this example there are 3.
The next is the data-frequency portion. 1 means recurring every 1 month. 0 means no recurring or straight sell single-month product. The rest of the code does not change.
This code will add any combination of product variants straight into your ReCharge Checkout avoiding any issues that you may encounter with adding multiple types of products with different shipping frequencies.
This also avoids having to setup any one-time products with a ReCharge ruleset. O
Effectively, what this is doing is adding the above array to any the cart via AJAX JavaScript. It’s putting the array and data values right in the URL so you can change it within the HTML and not having to crack open the Theme files. Now that’s flexible.
Additionally, this code can be integrated in a landing page builder, custom HTML site implementation or within the theme files for the home page itself. The point is it’s super flexible and allows you to.
Clearing The Recharge Cart
Then you need to add one last little bit of code needs to be added to any page that shows subscription products. This code will help clear the cart of any existing items so the items don’t get “stacked” when the user hits the back button. The “Sticky Cart” gets very annoying if you go back and forth a lot. You can end up with a huge amount of items inside the cart. Add this to any of the pages that would show the subscriptions:
<script> (function() {
$.ajax({
type: “POST”,
url: ‘//eadn-wc03-7781062.nxedge.io/cart/clear.js’,
});
})(); </script>
Will this work in a regular Shopify Ajax Add to Cart Scenario (without ReCharge)?
I haven’t tested it, but I imagine if you change the URL at the bottom of the code below, to a different checkout page, like the default Shopify Checkout, it will still work:
return “https://checkout.rechargeapps.com/r/checkout?myshopify_domain=” + myshopify_domain + “&cart_token=”+token+”&”+ga_linker+”&”+customer_param;
}
If you just change the redirect URL to the standard Shopify Checkout flow, you can still use the Ajax add to cart. But note, you will need to change all the button “1s” to “0s” so you are not doing subscription monthly products. Again, I haven’t tested it, but I imagine that the properties that determine the frequency would just be left undefined or cause errors in the console. I doubt it would stop the redirect, but rather just log an error and move on.
“properties[shipping_interval_frequency]”: frequency[i],
Test it and let me know if it works in the comments below.
Once all this is implemented, it could be a great idea to remove any references to the /collections, /collection/all, and any product pages.
They just won’t be useful here since we can use custom landing pages to build out any products we want. A simple way to remove the collections/all from view is to create a collection called “all” and manually add no products to it. That way, the users won’t see any products. Then you can just do a Javascript redirect to the home page to move any stray visitors from that page.
Don’t forget to de-index them from Google as well. Any pages that are removed here should also be de-indexed from your SEO. Basically, noindex, nofollow those links. You can use the SEO Manager App for this.
If you’re struggling with ReCharge or using the subscription platform, I hope this code helps you out.
Please let me know if you have questions.
Leave me some comments below!
This was very helpful and exactly what I needed! Thank you!
Matthew,
Thanks for the comment! You are very welcome. Please share this with others who might benefit from this too!
What was your use case?
Great solution! However, when I add this button on a product page I get the following 400 error:
POST //eadn-wc03-7781062.nxedge.io/cart/add.js 400
Mark, look at your error console to diagnose the issue. The code needs to be adapted to your specific situation. Also, make sure you included the //eadn-wc03-7781062.nxedge.io/cart/add.js at the bottom.
jQuery.ajax({
type: ‘POST’,
url: ‘//eadn-wc03-7781062.nxedge.io/cart/add.js’,
data: data,
dataType: ‘json’,
success: function() {
window.location.href = getCartUrl();
}
I have followed each step and your code works just fine. I can now go to checkout with a single click on a button at the homepage.
However, when I add this same on a product page, I receive a error 400 on the POST request: https://swiss-vitae.myshopify.com/cart/add.js 400
Mark, thanks for responding. This code was really designed to work on non-product pages. If you’re using ReCharge, I would avoid using the low-converting product pages and effectively disable the /collections /collections/all and any pages that reference the product pages.
I used a builder like Shogun or Gempages and added the class to the button to trigger the JS. Looks like a syntax error on the cart page or some sort of bad request. Try looking at the error console in Chrome or FF to determine the exact issue. Let me know if you are able to resolve it.
Thank you for your quick response. I’ve tried Gempages and it works for custom pages. I will avoid the standard product pages as you suggested, this will do the trick. Thank you kindly.
No problem. Wish you the best of luck!
Yury, the auto-populate function in checkout for existing customers does not function with this solution. The checkout fields will only auto-populate when the customer runs through the cart page -> proceed to checkout process. Is there an easy workaround?
Hey Mark! Thanks for the additional details. I was able to get this code working on various home pages. This doesn’t require the user to go through the cart. The Ajax code does need to load on the page you want it to execute on, however.
Hi, I used your code and put this button single
This is simple product though, no variants. But its not working.
Try creating a simple single variant of the product and use the variant ID of the product. Let me know if that works!
hii, i have used same code but ga_linker alert empty value how can fixed this issue.
Hey Pradeep! Can you please share additional details? What specifically is not working?
Hey! I am trying to implement this on a custom product page. I get the recharge selling plan id for the product by using their js api. then i use your solution above but when i use the main product id it gives me an error of cant find variant, and if I do the selected or first available variant, it gives me a cant add selling plan to variant. Any suggestions, thanks!
Hey Tyler! Would be happy to see if I can help, can you post some screenshots so we can see what’s going on?